
 Pin it
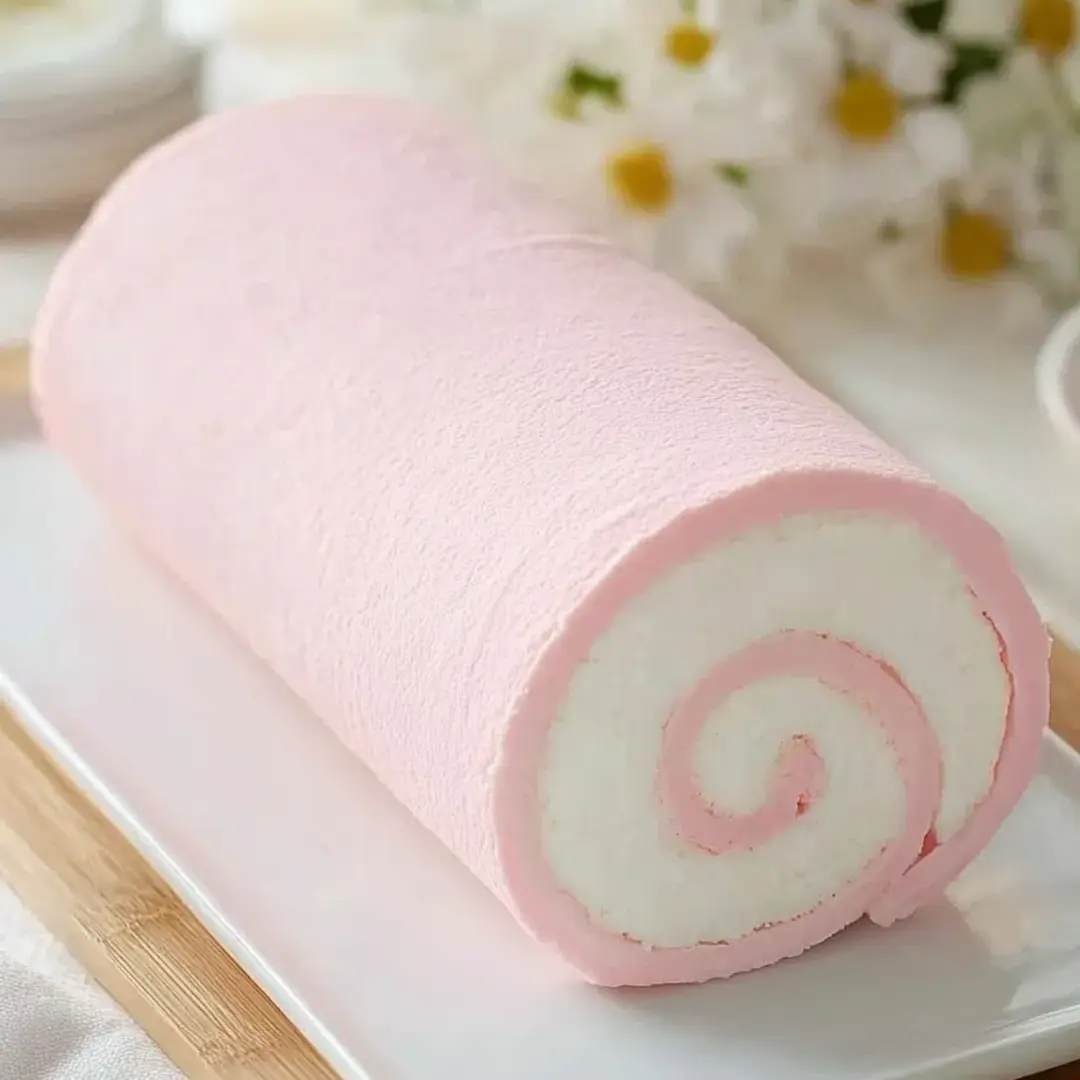
Light as air and delicately sweet, this Japanese-style cotton candy cake roll combines pillowy soft chiffon cake with stabilized whipped cream in a stunning pink spiral. The subtle cotton candy flavor offers a nostalgic taste without overwhelming sweetness, while the flexible cake recipe prevents the dreaded cracking that often plagues rolled cakes. Perfect for celebrations where both visual appeal and delicate flavor are desired, this show-stopping dessert looks impressive but follows surprisingly manageable techniques.
Last spring, I made this for my niece's birthday party, and the adults were just as enchanted as the children. My sister-in-law, who typically avoids overly sweet desserts, asked for the recipe after her first bite. The beautiful pink spiral slices created an elegant presentation that elevated the entire dessert table, while the light texture meant everyone had room for a slice even after a full meal.
Ingredients
- Cake flour: Creates a more tender crumb than all-purpose flour; the lower protein content prevents the cake from becoming tough
- Egg whites: Provide structure and leavening without the heaviness of yolks; creates the snow-white base perfect for tinting
- Cotton candy extract: Delivers that distinctive spun sugar flavor; high-quality extracts offer authentic taste without artificial overtones
- Cream of tartar: Stabilizes the egg white foam, ensuring your meringue reaches proper volume and stability
- Heavy cream: Forms the luscious filling; has enough fat content to whip into stable peaks
- Unflavored gelatin: The secret to a whipped cream filling that holds its shape without weeping or deflating
- Pink gel food coloring: Provides vibrant color without adding excess liquid that could affect the cake's texture
 Pin it
Step-by-Step Instructions
- Step 1:
- Prepare your workspace - Begin by lining an 8×12-inch rectangular cake pan with a silicone baking mat or parchment paper. Preheat your oven to 325°F (165°C). Having your workspace organized before starting is crucial for this recipe, as timing matters for achieving the perfect texture. Make sure all ingredients are measured and ready to go.
- Step 2:
- Mix the wet ingredients - In a small bowl, whisk together milk, vegetable oil, the first portion of sugar, and cotton candy extract until well combined. The oil adds moisture that keeps the cake flexible even after baking, while the extract infuses the base with subtle flavor. Set this mixture aside while you prepare the dry ingredients.
- Step 3:
- Sift the dry ingredients - In a large mixing bowl, sift together cake flour and salt. Sifting is essential for eliminating lumps and incorporating air, which contributes to the cake's fine texture. Create a well in the center of the dry ingredients to receive the wet mixture.
- Step 4:
- Combine wet and dry mixtures - Pour the wet ingredients into the well in your dry ingredients. Stir gently until just incorporated - overmixing develops gluten, resulting in a tough cake that's more prone to cracking when rolled. The batter should be smooth but not overworked. Set this mixture aside while you prepare the meringue.
- Step 5:
- Whip the meringue - In a clean, dry, non-plastic mixing bowl, begin whipping egg whites on low speed until frothy. Add cream of tartar, which provides acidity that stabilizes the foam structure. Increase to medium speed, and once the whites become opaque with tight bubbles, gradually add the second portion of sugar. Increase to medium-high speed and continue whipping until soft peaks form. Add pink gel food coloring, then continue whipping until stiff peaks form - the meringue should hold its shape and point upward when the beaters are lifted.
- Step 6:
- Fold together - Using a large spatula, gently fold the meringue into the flour mixture in three additions. This gradual incorporation preserves the air bubbles that provide lift and lightness. Use a cutting motion down the center, then scoop from the bottom and fold over the top, rotating the bowl slightly with each fold. Continue until no white streaks remain, but be careful not to deflate the batter.
- Step 7:
- Bake the cake - Pour the batter into your prepared pan and spread it evenly with an offset spatula. Tap the pan gently on the counter a few times to release any large air bubbles. Bake for 10-12 minutes until the cake springs back when touched in the center and a toothpick inserted comes out clean. Don't overbake, as this will make the cake too dry to roll without cracking.
- Step 8:
- Cool slightly - Allow the cake to cool in the pan for 5 minutes, which gives it time to set while remaining flexible. Place a cooling rack over the cake pan, then carefully flip the cake onto the rack and gently remove the parchment paper or silicone mat. The side facing up will eventually become the outer surface of your cake roll.
- Step 9:
- Prepare stabilized whipped cream - Place your mixing bowl, beaters, and heavy cream in the refrigerator for at least 15 minutes to chill thoroughly. Sprinkle unflavored gelatin over cold water in a small, heatproof container and let it bloom for 5 minutes. Melt the bloomed gelatin by placing the container in a small saucepan with simmering water, stirring until completely dissolved. Allow it to cool slightly while you begin whipping the cream.
- Step 10:
- Whip the cream filling - Begin whipping the chilled heavy cream and sugar on medium speed. When the beaters start leaving tracks in the cream, slowly pour in the cooled liquid gelatin between the beaters and the side of the bowl while continuing to whip. Add cotton candy extract, then increase speed to medium-high and continue whipping until stiff peaks form. Be careful not to overwhip, which can turn the cream grainy.
- Step 11:
- Assemble the cake roll - Spread the stabilized whipped cream evenly over the cake, leaving a small border around the edges. Place extra cream along the short edge that will be rolled first, which helps prevent cracking by filling the center of the spiral. Using the parchment paper as a guide, carefully roll the cake from the short edge, applying gentle pressure to form a tight spiral without squeezing out the filling.
- Step 12:
- Set and serve - Wrap the finished roll in plastic wrap, twisting the ends to secure it. Place in the refrigerator for at least 2 hours to set completely. For the cleanest slices, use a sharp knife dipped in hot water and wiped clean between cuts. For an elegant presentation, trim the ends before serving to reveal the perfect spiral pattern.
Creating the Perfect Roll
The key to a successful cake roll lies in preventing cracks. This recipe addresses that challenge in multiple ways: using oil instead of butter for moisture, not overmixing the batter, baking just until done, and rolling while the cake is still slightly warm and flexible. Adding extra cream at the starting edge creates a gentle curve rather than a sharp bend, further reducing the risk of cracks.
 Pin it
Flavor Variations
While cotton candy creates a delightful and unique flavor profile, this versatile cake base can be adapted to other flavors: vanilla extract with a touch of almond creates a classic combination, while citrus zest and extract offer a refreshing alternative. For chocolate lovers, cocoa powder can be substituted for a small portion of the cake flour, with chocolate extract enhancing the flavor.
Storage and Make-Ahead Tips
This cake roll can be made a day ahead and stored in the refrigerator, wrapped tightly in plastic wrap. The stabilized whipped cream will maintain its texture without weeping or deflating. For longer storage, individual slices can be frozen for up to a month - simply thaw in the refrigerator before serving.
My first attempt at this cake resulted in a crack because I tried to roll it too tightly. I've learned that gentle pressure and patience create the most beautiful spiral. Remember that the cake continues to set as it chills, so what might feel too loose at first will firm up perfectly in the refrigerator.
This cotton candy cake roll represents the perfect balance of technique and simplicity. While it requires attention to detail, each step builds on the last to create something truly special. The delicate pink color and subtle sweetness make it appropriate for so many celebrations - from baby showers to birthdays to afternoon tea. When you present this beautiful spiral cake, you're offering not just a dessert but a memorable experience that delights both the eye and the palate.
Frequently Asked Questions
- → Where can I find cotton candy extract?
- Cotton candy extract can be found in baking supply stores, some craft stores with baking sections, or online retailers. If you can't find it, you can substitute with vanilla extract and add a bit more sugar.
- → Why do I need to use gelatin in the whipped cream?
- The gelatin stabilizes the whipped cream, preventing it from weeping or losing its structure over time. This is especially important for cake rolls since they need to hold their shape. If you prefer not to use gelatin, you can substitute with 2 tablespoons of instant vanilla pudding mix.
- → Why did my cake crack when I tried to roll it?
- Cracks usually happen if the cake is too dry or cooled too much. Roll the cake while it's still slightly warm, not hot or completely cool. Also, be sure not to overbake the cake, as this makes it dry and prone to cracking.
- → Can I make this cake without food coloring?
- Absolutely! The food coloring is purely for visual appeal. You can leave it out completely for a natural look, or use natural food colorings like butterfly pea flower powder for blue or beetroot powder for pink.
- → How far in advance can I make this cake roll?
- This cake roll can be made 1-2 days in advance and stored in the refrigerator in an airtight container. The stabilized cream helps it maintain its texture and prevents it from drying out too quickly.