
 Pin it
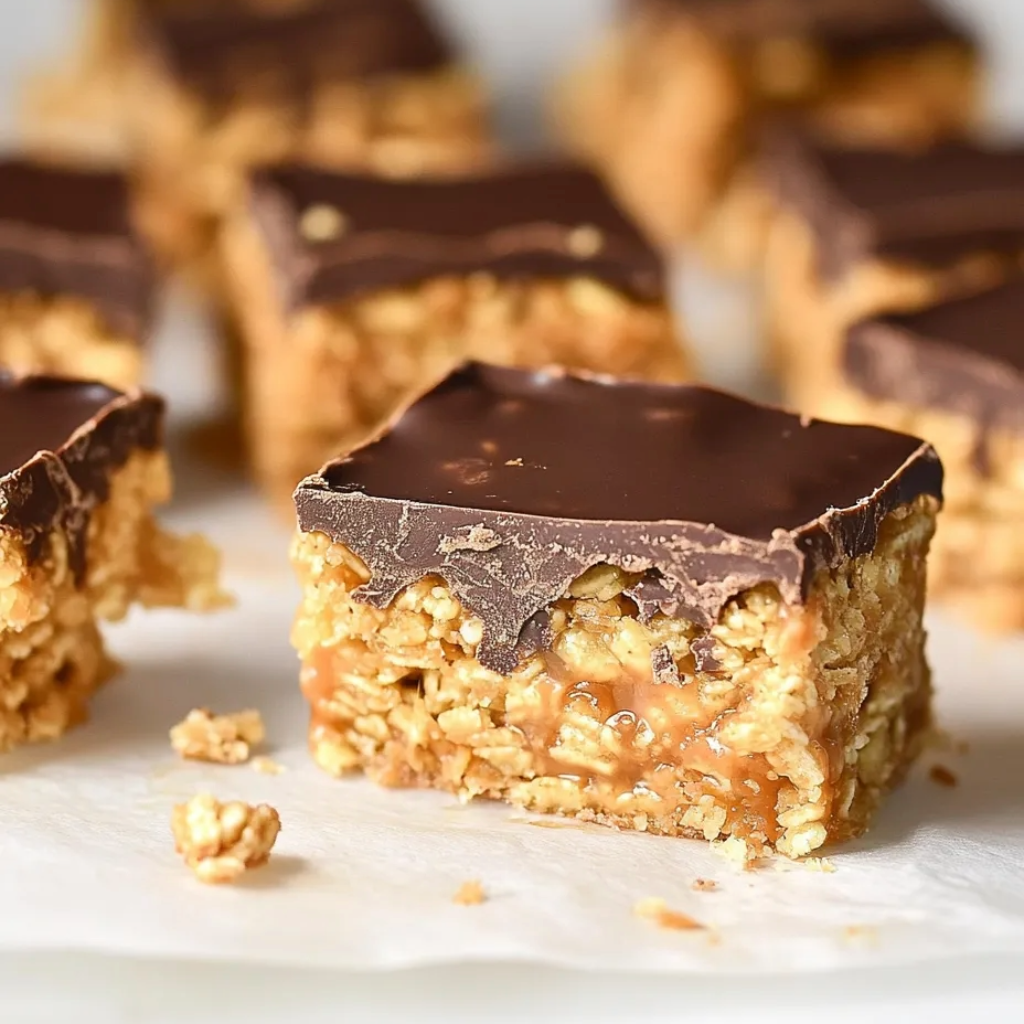
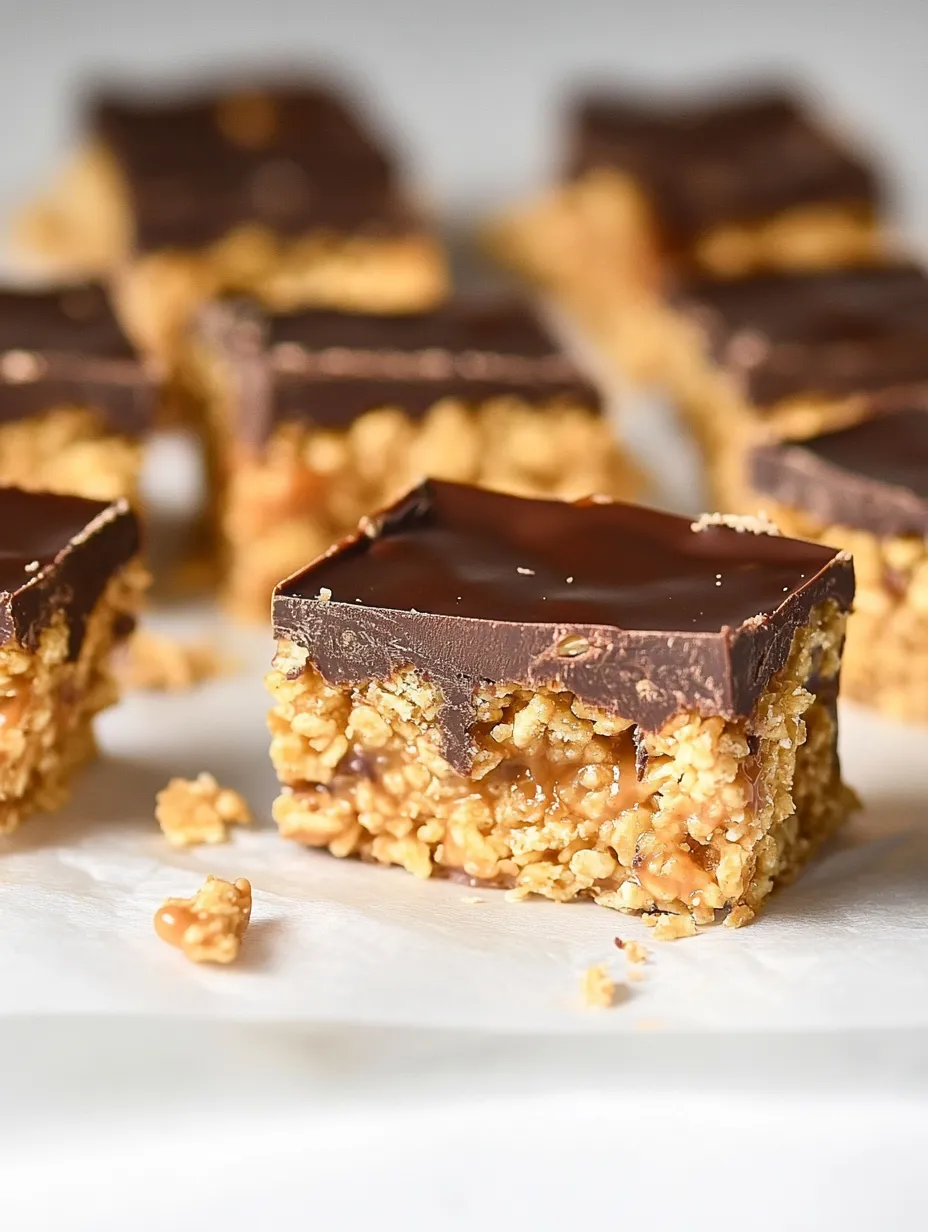
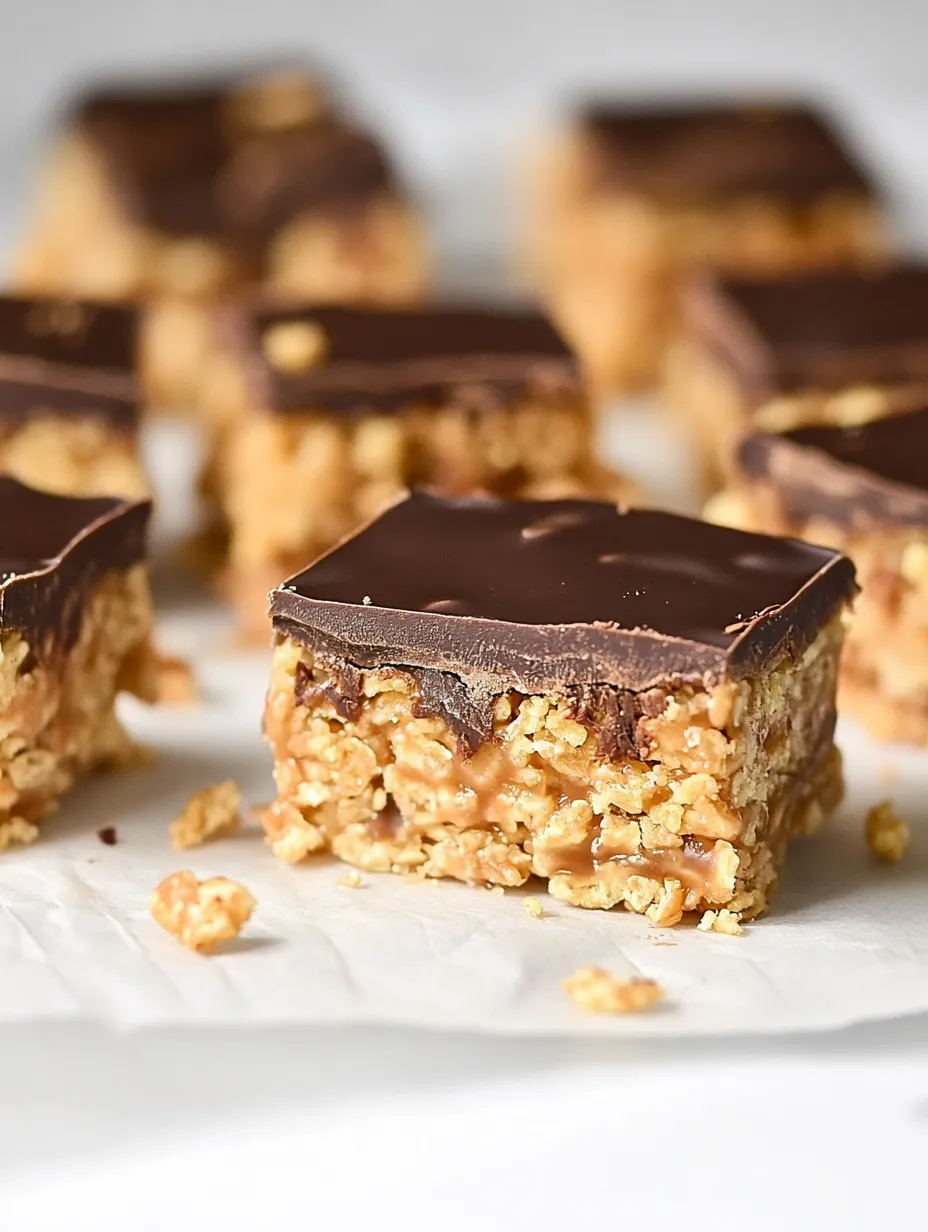
These incredible chocolate peanut butter Rice Krispie treats were born from my stubborn resistance to tradition. While my family has always been devoted Rice Krispie treat enthusiasts—especially during our annual summer camping trips—I've never been able to get excited about those sticky, overly sweet blue-wrapped squares. Ten years ago, determined to create a version I could genuinely look forward to, I embarked on what became a game-changing kitchen experiment. What emerged was this magnificent collision of textures and flavors: the familiar snap of Rice Krispies mingled with the peanut butter punch of Cap'n Crunch, all bound together with marshmallow and peanut butter, then crowned with a silky chocolate layer studded with crumbled Reese's cups. The result is an irresistible symphony of chewy, creamy, crunchy, and rich that has since become our family's most anticipated camping tradition. They're demolished within hours of their unveiling, with everyone sneaking 'just one more piece' until suddenly, miraculously, the entire pan has vanished.
The year I first brought these treats to our family camping trip, a curious thing happened. My usually chatty cousins fell silent as they took their first bites, eyes widening in appreciation. My uncle, who typically maintains a dignified approach to desserts, was caught sneaking pieces from the container well past midnight. What surprised me most was my own reaction—I found myself rationing the remaining treats, secretly hoping there would be some left just for me. The humble Rice Krispie treat, which I'd dismissed my entire life, had in this elevated form become something I actually craved.
Ingredients (with Selection Tips)
- Rice Krispies Cereal (3 cups): The classic crispy rice provides the traditional backbone of the treat. Choose the name brand for the best texture—store brands sometimes have a different density that affects the final product. These airy puffs create the perfect vehicle for absorbing the sweet marshmallow mixture while maintaining their crunch.
- Peanut Butter Cap'n Crunch (3 cups): This is the secret weapon that transforms ordinary into extraordinary. The intensely peanut-buttery cereal adds another layer of crunch and flavor that plays perfectly against the Rice Krispies. The slightly more substantial texture creates delightful variation in each bite. You'll find this in the regular cereal aisle of most grocery stores.
- Marshmallows (16 oz bag): Either mini or regular size work perfectly. Fresh marshmallows melt more smoothly than older ones, so check for softness when squeezing the bag. The marshmallows create that nostalgic chewy texture while binding everything together. They're the essential canvas that allows the peanut butter flavor to shine.
- Smooth Peanut Butter (1/2 cup): Choose a commercial brand like Jif or Skippy rather than natural versions. The stabilizers in commercial peanut butter help maintain the perfect consistency in these treats. The natural kinds can separate and affect the texture of the finished bars. This adds an additional layer of peanut butter flavor that infuses the entire base.
- Butter (1/2 cup, 1 stick): Unsalted butter gives you better control over the overall saltiness. The butter adds richness and helps prevent the marshmallow mixture from becoming too sticky or difficult to work with. It also contributes to that melt-in-your-mouth quality that makes these treats so addictive.
- Peanut Butter Chips (1 cup): These little flavor bombs create pockets of intense peanut butter goodness throughout the bars. Look for them in the baking aisle near the chocolate chips. As they slightly melt from the warm marshmallow mixture, they create wonderful little pockets of concentrated peanut butter flavor that surprise your taste buds.
- Semi-Sweet Chocolate Chips (1 1/2 cups): The slightly bitter edge of semi-sweet chocolate beautifully balances the sweetness of the marshmallows. Use high-quality chips for the smoothest melting. The chocolate layer adds sophistication to what would otherwise be a simple childhood treat. Feel free to substitute dark or milk chocolate based on your preference.
- Coconut Oil (1 tablespoon): This helps the chocolate melt smoothly and creates a more spreadable consistency. It also gives the chocolate topping a beautiful shine and snap when you bite into it. The subtle coconut flavor is undetectable in the finished product. Vegetable oil can substitute if needed.
- Reese's Peanut Butter Cups (4 full-size cups): The iconic candy provides both visual appeal and another texture dimension. Their familiar flavor ties the whole dessert together as the perfect finishing touch. The slightly salty peanut butter filling in the cups contrasts beautifully with the sweet chocolate coating.
Step-by-Step Cooking Instructions
- Step 1:
- Prepare Your Pan — Line a 9×13 inch baking pan with parchment paper, leaving some overhang on the sides to create handles for easy removal later. If you don't have parchment, coat the pan generously with cooking spray, making sure to get into the corners. This step is crucial—these treats can be incredibly sticky and difficult to remove without proper pan preparation. For thinner treats with more surface area for chocolate topping, use a larger 14×10 inch pan.
- Step 2:
- Combine the Dry Ingredients — In a very large bowl, mix together the Rice Krispies, Cap'n Crunch, and peanut butter chips. The bowl needs to be significantly larger than you might think—once you add the marshmallow mixture, you'll need plenty of room to stir without cereal flying everywhere. Toss everything gently to distribute the components evenly, ensuring the peanut butter chips are well-dispersed throughout the cereals.
- Step 3:
- Create the Marshmallow Mixture — In a large saucepan over low heat, melt the butter completely. Low heat is crucial here—too high and you risk burning the butter or marshmallows. Add the entire bag of marshmallows to the melted butter and stir constantly with a heatproof spatula or wooden spoon. Continue stirring until the marshmallows are completely melted and the mixture is smooth and glossy. This should take about 4-5 minutes—patience here prevents scorching.
- Step 4:
- Add the Peanut Butter — Once the marshmallows are fully melted, add the 1/2 cup of smooth peanut butter to the saucepan. Stir vigorously until completely incorporated and no streaks remain. Remove the pan from heat immediately after the peanut butter is incorporated to prevent the mixture from becoming too stiff to work with. The warm mixture should be fluid enough to coat the cereal but thick enough to hold the treats together.
- Step 5:
- Combine Wet and Dry Ingredients — Working quickly, pour the peanut butter marshmallow mixture over the cereal mixture. Use a silicon spatula to fold everything together, making sure all the cereal gets coated. This requires some muscle and speed—the marshmallow mixture starts setting up almost immediately. Don't worry about breaking some of the cereal; a little crushing is inevitable and actually helps the treats hold together.
- Step 6:
- Press Into the Pan — Transfer the mixture to your prepared pan. Here's a pro tip: lightly wet your hands with cold water or spray them with cooking spray, then use your fingers to firmly press the mixture into an even layer. The water or oil prevents the mixture from sticking to your hands. Press firmly to ensure good cohesion, but don't compact it too much or the treats will become dense and hard rather than pleasantly chewy.
- Step 7:
- Prepare the Chocolate Topping — Place the chocolate chips and coconut oil in a microwave-safe bowl. Microwave in 30-second intervals, stirring thoroughly between each interval, until completely melted and smooth. This typically takes about 1-2 minutes total. Be careful not to overheat the chocolate, which can cause it to seize and become grainy. The coconut oil creates a silky-smooth consistency perfect for spreading.
- Step 8:
- Add the Topping — Pour the melted chocolate mixture over the cereal layer, using a spatula to spread it evenly to the edges. Work relatively quickly while the chocolate is still warm and fluid. The chocolate layer should be thin enough to cut through easily later but thick enough to provide that rich chocolate flavor in every bite. Aim for about 1/4 inch of chocolate topping.
- Step 9:
- Finish with Reese's — Unwrap the Reese's cups and chop them into small pieces, or simply crumble them with your fingers for a more rustic look. Sprinkle the pieces evenly over the still-warm chocolate layer, gently pressing them in just enough to ensure they adhere without sinking completely. This not only adds another flavor dimension but also creates an irresistible visual appeal that signals exactly what flavors await.
- Step 10:
- Chill to Set — Refrigerate the entire pan for at least one hour, or until the chocolate layer is completely set. This patience-testing step is essential—cutting too soon will result in a messy chocolate layer that smears rather than slices cleanly. The chilling also allows all the flavors to meld together beautifully, resulting in a more cohesive treat.
I've always been particularly fond of the corner pieces of these treats, where the chocolate layer slightly wraps around the edges, creating the perfect chocolate-to-cereal ratio in each bite. My husband, who typically reaches for anything chocolate without much discernment, has declared these 'dangerously good' and now requests them for occasions well beyond our annual camping trip. I've discovered that if I make them the day before we leave, letting them sit overnight at cool room temperature, the flavors develop a remarkable harmony that elevates them from delicious to truly exceptional.
Storage and Packing Tips
These treats keep beautifully at room temperature for 3-4 days when stored in an airtight container with parchment paper between layers to prevent sticking. For camping trips, I pack them in a hard-sided container rather than a plastic bag to prevent crushing. If you're camping in very hot weather, keep the container in a cooler or shaded area to prevent the chocolate topping from melting.
For longer storage, these can be frozen for up to 3 months. Wrap individual pieces in parchment paper, then store in a freezer-safe container. Thaw at room temperature for about 20 minutes before enjoying. The texture remains remarkably good even after freezing, though the cereal may lose a tiny bit of its crunch.
Creative Variations
While the original recipe is perfection in my eyes, here are some variations that maintain the spirit of these next-level treats:
- S'mores Edition: Substitute Golden Grahams for the Cap'n Crunch, use milk chocolate for the topping, and finish with mini marshmallows that you quickly toast with a kitchen torch.
- Dark Chocolate Sea Salt: Use a high-quality dark chocolate (70%) for the topping and sprinkle with flaky sea salt instead of Reese's cups for a more sophisticated flavor profile.
- Nutty Buddy: Add 1/2 cup chopped roasted peanuts to the cereal mixture and top with a combination of peanut butter cups and chopped Butterfinger bars.
These Chocolate Peanut Butter Rice Krispie Treats have become much more than just a camping tradition in our family—they're now the standard by which all other no-bake desserts are measured. Their ability to convert even the most skeptical Rice Krispie treat opponents (like my former self) is testament to how special they truly are. The beautiful thing about creating your own traditions is watching them evolve and take on meaning beyond the food itself. Now when I make these treats, I'm not just preparing a dessert; I'm creating a moment that my family anticipates all year long—a sweet prelude to days spent together under the stars, sharing stories and making memories that, like these treats, just get better with time.
Frequently Asked Questions
- → Can I substitute the Cap'n Crunch cereal?
- Yes! If you can't find peanut butter Cap'n Crunch, you can use regular Cap'n Crunch or even substitute with Chex, Cheerios, or additional Rice Krispies. The texture will be slightly different but still delicious.
- → Why are my rice krispie treats too hard?
- This usually happens when the marshmallow mixture gets too hot or is cooked too long. Keep your heat low when melting the marshmallows and remove from heat as soon as they're melted to maintain that perfect chewy texture.
- → Can I make these without peanut butter for allergies?
- Absolutely! Substitute the peanut butter with sun butter, almond butter, or cookie butter. Skip the peanut butter chips and Reese's cups, replacing them with regular chocolate chips and chopped chocolate bars instead.
- → Do I have to refrigerate these treats?
- Refrigeration is only needed to set the chocolate topping quickly. Once set, they can be stored at room temperature for 2-3 days, though refrigeration will extend their freshness and maintain a firmer texture.
- → How do I get clean-cut squares?
- For perfect cuts, use a sharp knife sprayed with cooking spray or dipped in hot water and wiped clean between cuts. Cutting when the treats are fully chilled gives the cleanest results.