
 Pin it
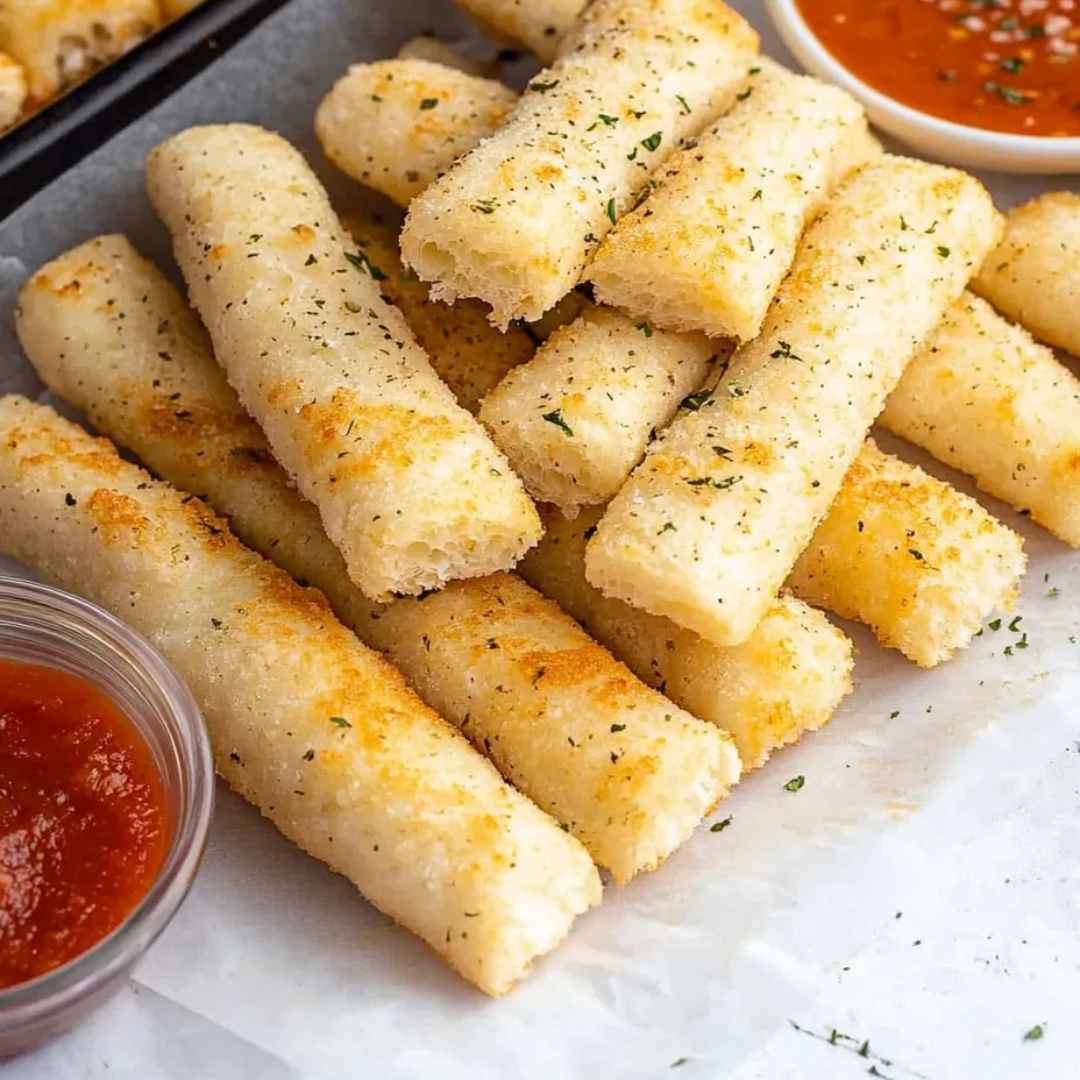
The aroma of freshly baked bread has a way of transforming a house into a home. These sheet pan breadsticks first made an appearance in my kitchen on a cold Sunday afternoon when I needed something to accompany a pot of minestrone soup. What started as a simple experiment has become one of my most requested recipes. There's something deeply satisfying about the process—watching the yeast bubble to life, feeling the dough transform beneath your hands, and that moment when the buttery, garlic-infused scent begins wafting from the oven. These breadsticks strike the perfect balance between pillowy interior and slight crispness at the edges, with a savory garlic-parmesan topping that makes them impossible to resist. The beauty of this recipe is its simplicity—with pantry staples and less than 10 ingredients, you can create something that tastes like it came from your favorite Italian restaurant.
I discovered the sheet pan method quite by accident when I was baking for a large family gathering and ran out of baking sheets. Pressed for time and unwilling to wait for batches, I spread the dough across an entire sheet pan, planning to cut it later. The result was a game-changer—perfectly even cooking, a wonderful texture, and enough breadsticks for everyone with just one pan to wash! My brother-in-law, who typically skips bread entirely, ate four in succession and asked if I'd been holding out on them all these years with a secret family recipe. Little did he know it had been created that very day.
Ingredients (with Selection Tips)
- All-Purpose Flour (2½ cups): Select unbleached flour for the best flavor. The protein content in all-purpose flour (around 10-12%) creates the perfect chewy yet tender texture. In a pinch, bread flour works too but will yield a slightly chewier result. Measuring accurately is crucial—fluff the flour, spoon it into your measuring cup, and level with a knife.
- Active Dry Yeast (2¼ teaspoons or 1 packet): Always check the expiration date—fresh yeast is essential for proper rising. Store unused yeast in the refrigerator or freezer to extend its shelf life. If you only have instant yeast, you can substitute it directly but may find the rise time slightly shorter.
- Granulated Sugar (1 tablespoon): Regular white sugar works perfectly here. It feeds the yeast and encourages proper fermentation without making the breadsticks noticeably sweet. The sugar also contributes to the beautiful golden color as the breadsticks bake.
- Warm Water (1 cup): The temperature should be around 105-115°F—think of warm bath water. Too hot will kill the yeast; too cool won't activate it properly. In the absence of a thermometer, test with your wrist—it should feel warm but not hot.
- Salt (1 teaspoon): Regular table salt works fine, but kosher salt provides better flavor distribution. Salt not only enhances flavor but also regulates yeast activity for the perfect rise. Never skip this ingredient—unsalted bread tastes flat and one-dimensional.
- Melted Butter (¼ cup): Use unsalted butter to control the overall salt level. Butter adds richness and helps create that irresistible golden-brown exterior. For an even more pronounced buttery flavor, try European-style butter with its higher fat content.
- Garlic Salt (½ teaspoon): Look for garlic salt made with real garlic rather than artificial flavoring. This seasoning provides the perfect balance of salt and garlic flavor in one convenient ingredient. If you prefer a more pronounced garlic flavor, increase to ¾ teaspoon.
- Italian Seasoning (1 teaspoon): A quality blend should include oregano, basil, thyme, and rosemary. Crush it between your fingers before sprinkling to release the essential oils and intensify the aroma. This simple addition transforms basic breadsticks into an aromatic delight.
- Grated Parmesan Cheese (¼ cup): Freshly grated Parmesan provides superior flavor and melting qualities. Pre-grated varieties often contain anti-caking agents that affect texture and flavor. The nutty, salty notes of good Parmesan complement the garlic perfectly and create delicious crispy bits where it touches the pan.

Step-by-Step Cooking Instructions
- Step 1:
- Activate the Yeast — In a large mixing bowl, combine 1 cup warm water (105-115°F), 2¼ teaspoons active dry yeast, 1 tablespoon sugar, and 1 teaspoon salt. Stir gently to dissolve the sugar and salt. Let this mixture rest for 5-10 minutes until it becomes frothy and bubbly. This visual cue confirms your yeast is alive and active. If the mixture doesn't foam, your yeast may be old or the water temperature incorrect—better to start over than proceed with inactive yeast.
- Step 2:
- Form the Dough — Using a stand mixer fitted with a dough hook, gradually add 2½ cups flour to the yeast mixture. Mix on low speed until the flour is incorporated, then increase to medium speed and mix until the dough forms a loose ball and pulls away from the sides of the bowl, about 3-4 minutes. The dough should be soft and slightly sticky but cohesive. If it's too sticky to handle, add additional flour, 1 tablespoon at a time. If mixing by hand, use a wooden spoon initially, then knead on a floured surface for about 5 minutes.
- Step 3:
- First Rise — Cover the mixing bowl with a clean kitchen towel or plastic wrap and place in a warm, draft-free area. Let the dough rise for 30-45 minutes, or until it has approximately doubled in size. The perfect rising spot is an oven with just the light turned on—it creates a consistent warm environment. This first rise develops flavor and texture that makes these breadsticks special.
- Step 4:
- Prepare the Baking Surface — Preheat your oven to 350°F. Line a standard half-sheet pan (approximately 18x13 inches) with parchment paper for easy cleanup. Melt ¼ cup butter and pour half of it (2 tablespoons) evenly over the parchment-lined pan. This butter layer creates a gorgeously crisp bottom crust and infuses the breadsticks with rich flavor as they bake.
- Step 5:
- Shape the Breadsticks — Once the dough has doubled in size, transfer it directly to the center of the prepared sheet pan. Using your fingertips, gently press and stretch the dough outward from the center toward the edges of the pan. Be patient with this process—the dough may resist at first but will gradually relax. Continue until the dough reaches all corners, forming an even layer that covers the entire pan. The butter underneath will make this process easier and prevent sticking.
- Step 6:
- Add the Toppings — Pour the remaining 2 tablespoons of melted butter over the top of the dough, using a pastry brush to ensure even coverage all the way to the edges. This top layer of butter creates a perfect base for the seasonings to adhere to. Sprinkle the dough evenly with ¼ cup grated Parmesan cheese, ½ teaspoon garlic salt, and 1 teaspoon Italian seasoning. For the most even distribution, sprinkle from about 12 inches above the pan, which allows the seasonings to fall more uniformly.
- Step 7:
- Second Rise — Allow the topped dough to rest and rise again for 15-20 minutes. This shorter second rise gives the dough just enough time to become puffy without overproofing. You'll know it's ready when the dough has risen about an inch and looks light and airy. This step ensures the perfect texture—skip it, and your breadsticks may be dense.
- Step 8:
- Cut and Bake — Using a pizza cutter or sharp knife, score the dough into breadstick-sized portions. You can cut them into traditional long strips or crosshatch for smaller, bite-sized pieces. Don't press too hard—just enough to mark the surface without compressing the dough. Bake in the preheated oven for 18-20 minutes, until the edges are golden brown and the center is fully cooked. Rotate the pan halfway through baking if your oven has hot spots.
- Step 9:
- Cool and Serve — Remove from the oven and let cool for just 2-3 minutes on the pan. This brief rest allows the breadsticks to set up slightly, making them easier to cut along your pre-scored lines. Transfer to a cutting board and slice completely through the pre-scored lines. Serve warm for the most delightful experience—when they're fresh from the oven, the contrast between the slightly crisp exterior and tender interior is at its peak.
I've always been partial to the corner pieces of these breadsticks. While the center pieces are wonderfully soft and tender, the edges develop this magical crispy-chewy texture that reminds me of focaccia. My daughter, who typically avoids crusts on regular bread, fights her brothers for the corner pieces—a parenting win I never expected from a simple breadstick recipe! I've found that grating the Parmesan extra fine helps it melt more evenly across the top, while a coarser grate creates delicious crispy cheese bits that add wonderful textural contrast.
Storage and Make-Ahead Tips
While these breadsticks are absolutely divine fresh from the oven, leftovers can be stored in an airtight container at room temperature for up to 3 days. To reheat, wrap them loosely in foil and warm in a 300°F oven for about 5 minutes. This gentle reheating revives them beautifully without drying them out.
For make-ahead convenience, prepare the dough through the first rise, then refrigerate for up to 24 hours. When ready to bake, remove from the refrigerator, press into the sheet pan, top, and allow to come to room temperature (about 30 minutes) before baking as directed.
These breadsticks also freeze exceptionally well. Once completely cooled, place them in a freezer-safe bag with parchment paper between layers to prevent sticking. They'll keep for up to 3 months. Reheat from frozen in a 325°F oven for 5-7 minutes until warmed through.
Serving Suggestions
These versatile breadsticks pair beautifully with so many dishes! Serve them alongside a hearty minestrone or creamy tomato soup for dipping. They're perfect with pasta dishes like spaghetti and meatballs or lasagna, where the breadsticks can mop up every last bit of sauce. For appetizers, I often serve them with a small bowl of warm marinara or garlic butter for dipping.
For a twist on pizza night, I serve these breadsticks with various dipping sauces—marinara, garlic butter, pesto, and even ranch dressing—allowing everyone to customize their experience. They're also substantial enough to pack in lunchboxes as an alternative to sandwiches when paired with cheese and fresh fruit.
Creative Variations
Over the years, I've experimented with numerous variations on this basic recipe:
- Cinnamon Sugar Dessert Sticks: Omit the garlic salt and Italian seasoning. After baking, brush with melted butter and sprinkle with a mixture of cinnamon and sugar for a sweet treat.
- Everything Bagel Version: Replace the Italian seasoning with everything bagel seasoning for a breakfast-inspired twist.
- Rosemary Sea Salt: Substitute the Italian seasoning with fresh chopped rosemary and top with flaky sea salt for an elegant appetizer.
These Garlic Parmesan Sheet Pan Breadsticks represent everything I love about home cooking—simple ingredients transformed through time-honored techniques into something that brings people together around the table. There's a certain magic in the way the kitchen fills with the aroma of baking bread, drawing family members in from all corners of the house. Even in our busy modern lives, these breadsticks connect us to the centuries-old tradition of breaking bread together. Whether served alongside your favorite pasta or eaten straight from the pan (I won't tell!), they transform an ordinary meal into something special with minimal effort and maximum heart.
Frequently Asked Questions
- → Can I make the dough ahead of time?
- Yes! You can prepare the dough up to 24 hours in advance and store it in the refrigerator. When ready to use, let it come to room temperature for about 30 minutes before shaping in the pan.
- → Can I use active dry yeast instead of instant?
- Yes, both types work in this recipe. The method stays the same - let it bubble in warm water with sugar before adding flour. If using instant yeast, you can technically skip the activation step, but it's still helpful to confirm your yeast is active.
- → What can I serve with these breadsticks?
- These breadsticks are versatile! Serve them with marinara or pizza sauce for dipping, alongside pasta dishes, soups, stews, or salads. They're also great with spinach artichoke dip or hummus as an appetizer.
- → Can I freeze these breadsticks?
- Absolutely! Bake them as directed, let cool completely, then freeze in an airtight container for up to 3 months. Reheat in a 350°F oven for 5-7 minutes until warmed through. You can also freeze the unbaked dough after shaping.
- → What can I use instead of Parmesan cheese?
- Try Romano, Asiago, or nutritional yeast for a dairy-free option. You can also omit the cheese entirely and just use the garlic and herbs, or try everything bagel seasoning for a different flavor profile.