
 Pin it
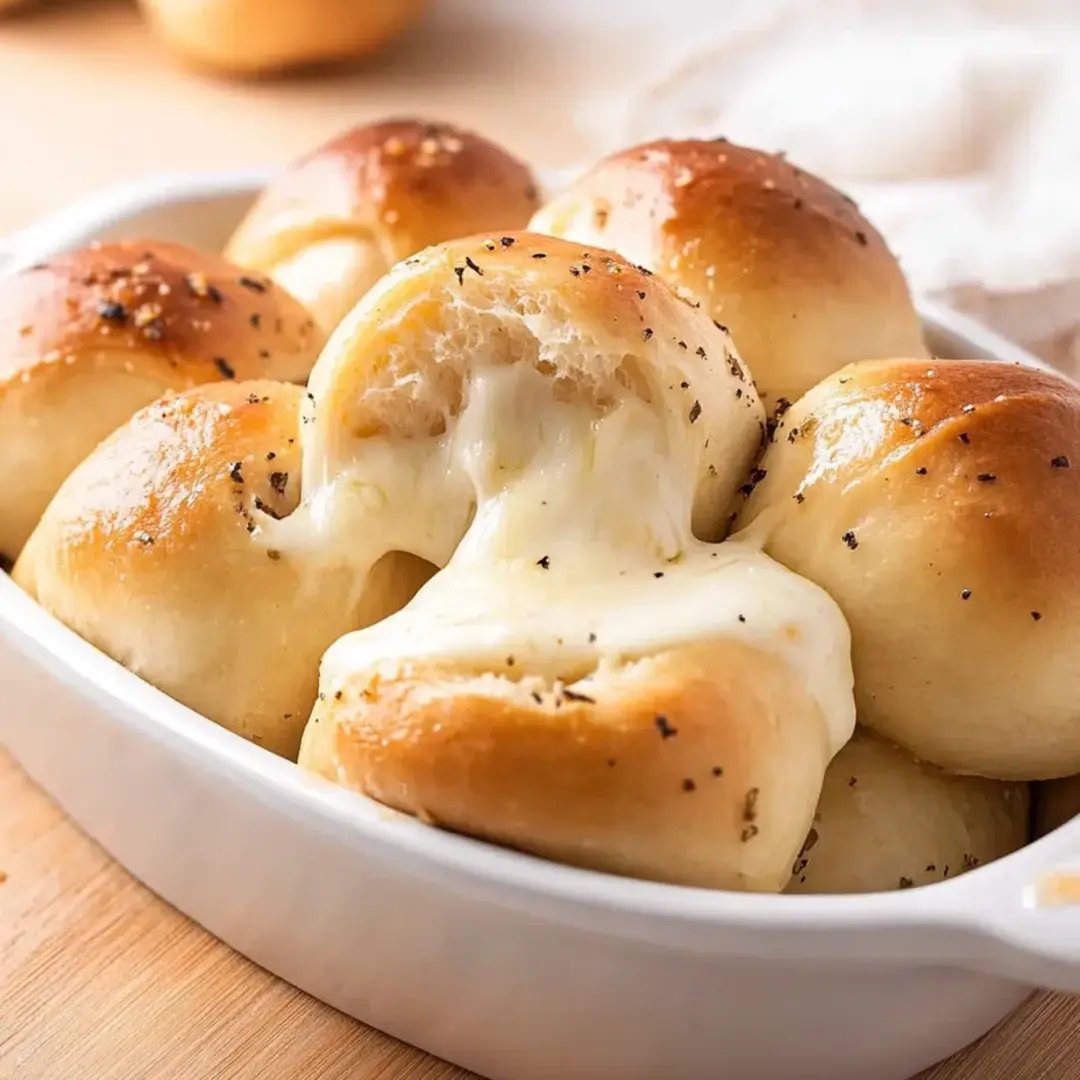
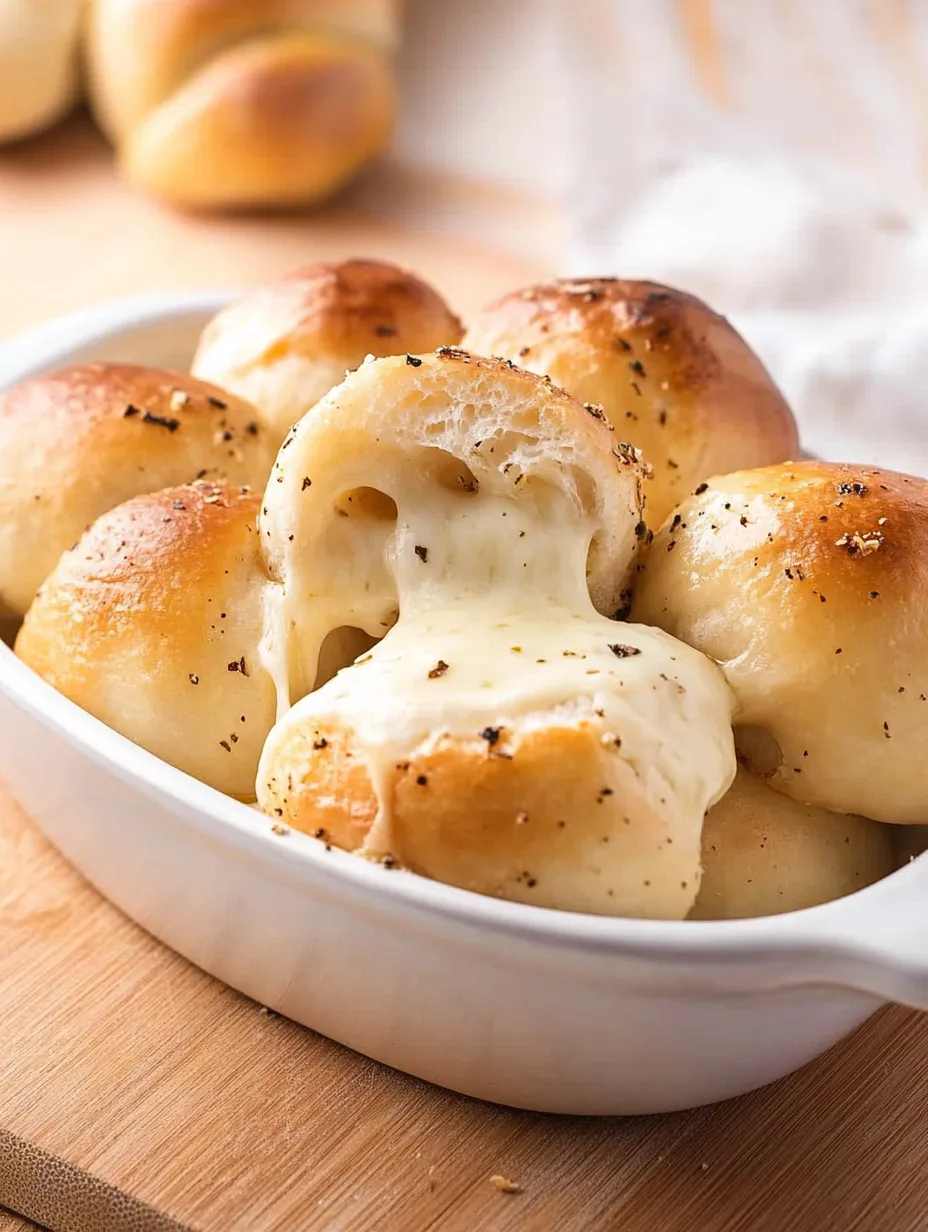
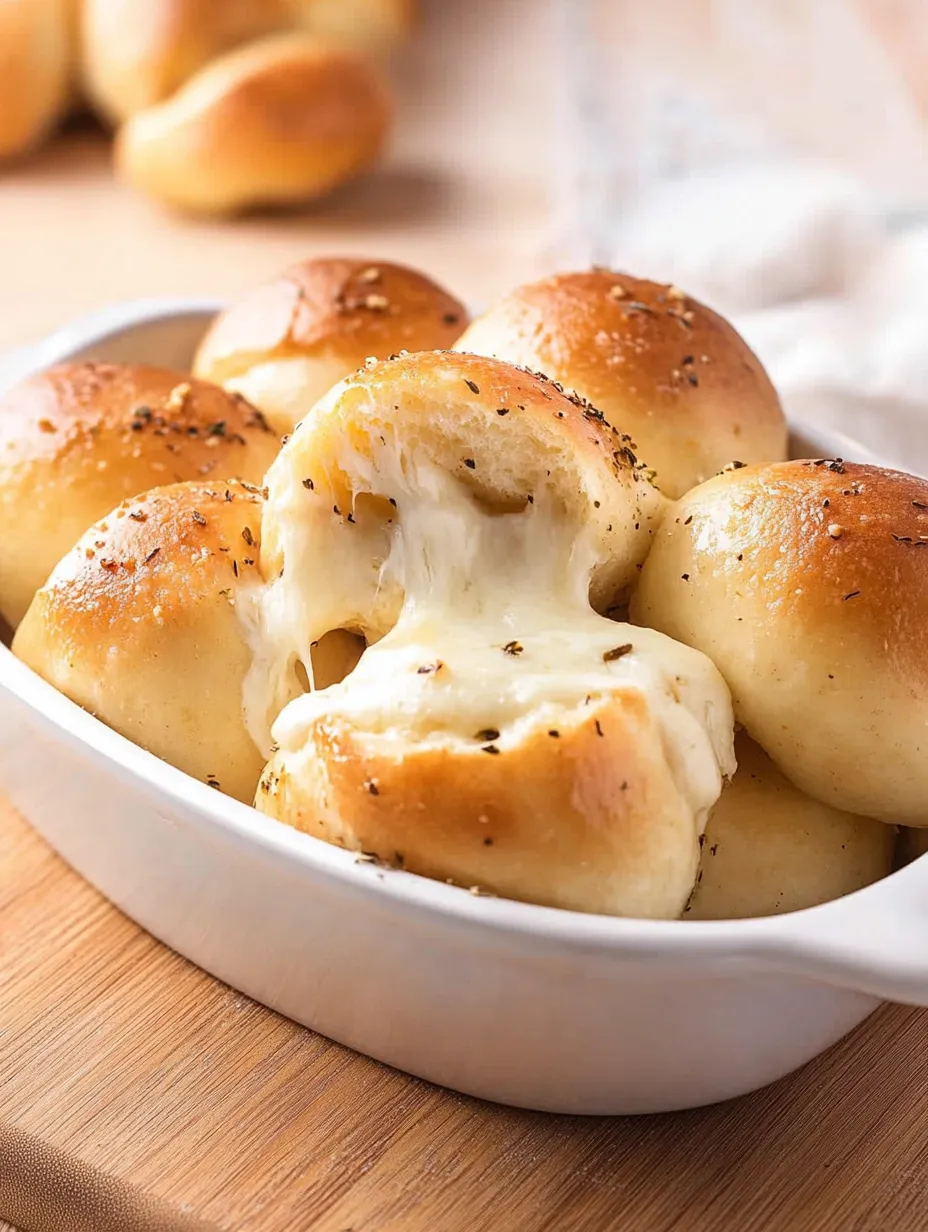
These irresistible Cheesy Garlic Bliss Bombs combine warm, buttery biscuit dough wrapped around a savory mixture of garlicky ground beef and two kinds of melty cheese. Each bite delivers the perfect balance of crispy exterior and gooey, cheesy interior that will have everyone reaching for seconds. Whether you're hosting game night, need a crowd-pleasing appetizer, or just craving something indulgently delicious, these flavor-packed bombs are guaranteed to disappear within minutes.
The first time I made these for my family's weekly movie night, they disappeared so quickly I barely got to try one myself! My teenage son declared them "even better than pizza rolls" and has requested them for every gathering since. The combination of the garlic-infused beef with two types of cheese creates such a satisfying flavor explosion that it's nearly impossible to eat just one.
Ingredients
- 1 pound ground beef: Provides a hearty, savory base for the filling; lean ground beef works well, but don't go too lean or you'll lose some flavor
- 2 cloves garlic, minced: Fresh garlic infuses the beef with aromatic flavor that dried simply can't match
- ½ cup Parmesan cheese, diced: Adds a tangy, salty depth to the filling that perfectly complements the cheddar
- 1 cup cheddar cheese, cubed: Creates those irresistible cheese pulls when the bombs are broken open; sharp cheddar provides the best flavor contrast
- 1 can (16.3 oz) biscuit dough: Pillsbury Grands or similar work perfectly, creating a golden, flaky exterior with minimal effort
- 2 tablespoons butter, melted: Brushed on top for a beautiful golden finish and rich buttery flavor
- 1 tablespoon parsley, chopped: Optional garnish that adds a pop of color and fresh flavor
Step-by-Step Instructions
- Prepare your workspace:
- Preheat your oven to 375°F (190°C) and line a baking sheet with parchment paper to prevent sticking. This also makes cleanup much easier.
- Cook the beef filling:
- Heat a skillet over medium heat and add the ground beef, breaking it into crumbles as it cooks. Continue cooking until the beef is completely browned with no pink remaining, about 5-7 minutes. Drain any excess grease from the pan to prevent your filling from becoming too oily.
- Add aromatic garlic:
- Add the minced garlic to the cooked beef and stir continuously for 1-2 minutes until fragrant. Be careful not to burn the garlic as it can become bitter. Remove the skillet from heat and allow the mixture to cool slightly so it's easier to handle.
- Prepare the biscuit dough:
- Open the can of biscuit dough and separate the individual biscuits. Using your hands or a rolling pin, flatten each biscuit into a circle approximately 4 inches in diameter. The dough should be thin enough to wrap around the filling but not so thin that it tears.
- Assemble the bombs:
- Place a spoonful of the beef mixture in the center of each flattened biscuit. Top with a cube of cheddar cheese and a piece of diced Parmesan. Carefully fold the edges of the dough up and around the filling, pinching firmly to seal completely. Roll gently between your palms to form a ball shape.
- Position for baking:
- Place each stuffed ball seam-side down on the prepared baking sheet, spacing them about 2 inches apart to allow for expansion during baking. Positioning them seam-side down helps prevent the cheese from leaking out during baking.
- Add the buttery finish:
- Brush the tops and sides of each ball generously with melted butter. This creates that irresistible golden-brown finish and adds rich flavor to the exterior.
- Garnish before baking:
- If desired, sprinkle the buttered tops with chopped parsley for a pop of color and fresh flavor.
- Bake to perfection:
- Place the baking sheet in the preheated oven and bake for 15-18 minutes, or until the bombs are puffed up and golden brown on top. The biscuit dough should be fully cooked with no doughy spots remaining.
- Cool slightly and serve:
- Allow the bombs to cool for 3-5 minutes before serving. This brief rest allows the molten cheese inside to set slightly, making them easier to handle without burning yourself.
The Art of the Perfect Cheese Pull
The magic of these Cheesy Garlic Bliss Bombs lies in that dramatic moment when you break one open and witness the perfect cheese pull. To achieve this Instagram-worthy stretch:
- Use cheese that melts well (cheddar, mozzarella, or Monterey Jack)
- Cut the cheese into cubes rather than shredding it
- Make sure your bombs are still warm when served
- Pull them apart slowly to maximize the stretch
Serving Suggestions
While these bombs are absolutely delicious on their own, pairing them with the right dipping sauce elevates them to a whole new level. Some perfect pairings include:
- Marinara sauce for a pizza-inspired bite
- Ranch dressing for cool creaminess against the warm bombs
- Garlic butter for doubling down on the garlic goodness
- BBQ sauce for a sweet and tangy contrast
Make-Ahead and Storage Options
These versatile snacks can be prepared in advance in several ways:
- Make-ahead filling: Prepare the beef and garlic mixture up to 2 days in advance and refrigerate until ready to use.
- Assemble ahead: Form the bombs completely, cover them on the baking sheet, and refrigerate for up to 24 hours before baking.
- Freeze unbaked: Flash-freeze assembled bombs on a baking sheet, then transfer to a freezer bag for up to 2 months. Bake directly from frozen, adding 5-7 minutes to the baking time.
- Store leftovers: Keep any leftovers in an airtight container in the refrigerator for up to 3 days. Reheat in a 350°F oven for 5-7 minutes for best results.
The first time I brought these to a neighborhood potluck, I was stunned by how quickly they disappeared. I watched as people took their first bite and their eyes widened with delight at the unexpected explosion of flavors and textures. My neighbor's seven-year-old daughter, normally the pickiest eater, asked if she could have the recipe to give to her mom!
My final thought on these Cheesy Garlic Bliss Bombs is that they represent comfort food at its finest - simple ingredients transformed into something truly special. They remind me that sometimes the most memorable dishes aren't complicated gourmet creations, but rather these perfect little bites of happiness that bring people together. Whether you're feeding a hungry crowd or treating your family to something special, these bombs deliver on their promise of bliss in every bite.
Frequently Asked Questions
- → Can I use different meat instead of ground beef?
- Absolutely! Ground turkey, chicken, Italian sausage, or even plant-based meat alternatives work great in this recipe. Just make sure to cook the meat thoroughly before using it as filling.
- → Can I make these ahead of time?
- Yes, you have two options: 1) Prepare the beef filling up to 2 days ahead and refrigerate it, then assemble and bake when needed. 2) Assemble the entire bombs, place them on a baking sheet, cover with plastic wrap, and refrigerate for up to 24 hours before baking. You may need to add 2-3 minutes to the baking time if cooking from refrigerated.
- → My cheese is leaking out during baking. What am I doing wrong?
- This usually happens when the biscuit dough isn't sealed properly. Make sure to really pinch the edges of the dough together firmly and check for any small openings before baking. You can also try using slightly smaller cheese cubes placed in the center of the filling rather than at the edges.
- → What can I serve with these cheesy bombs?
- These versatile bombs pair wonderfully with marinara sauce, ranch dressing, or garlic butter for dipping. For a complete meal, serve with a simple green salad, roasted vegetables, or tomato soup. They also make great party appetizers served on their own.
- → Is there a way to make these without using canned biscuit dough?
- Yes, you can use homemade biscuit dough or pizza dough as alternatives. For a quick substitute, crescent roll dough will work too, though the texture will be slightly different. Just make sure to adjust the cooking time accordingly as homemade doughs may require different baking times.