
 Pin it
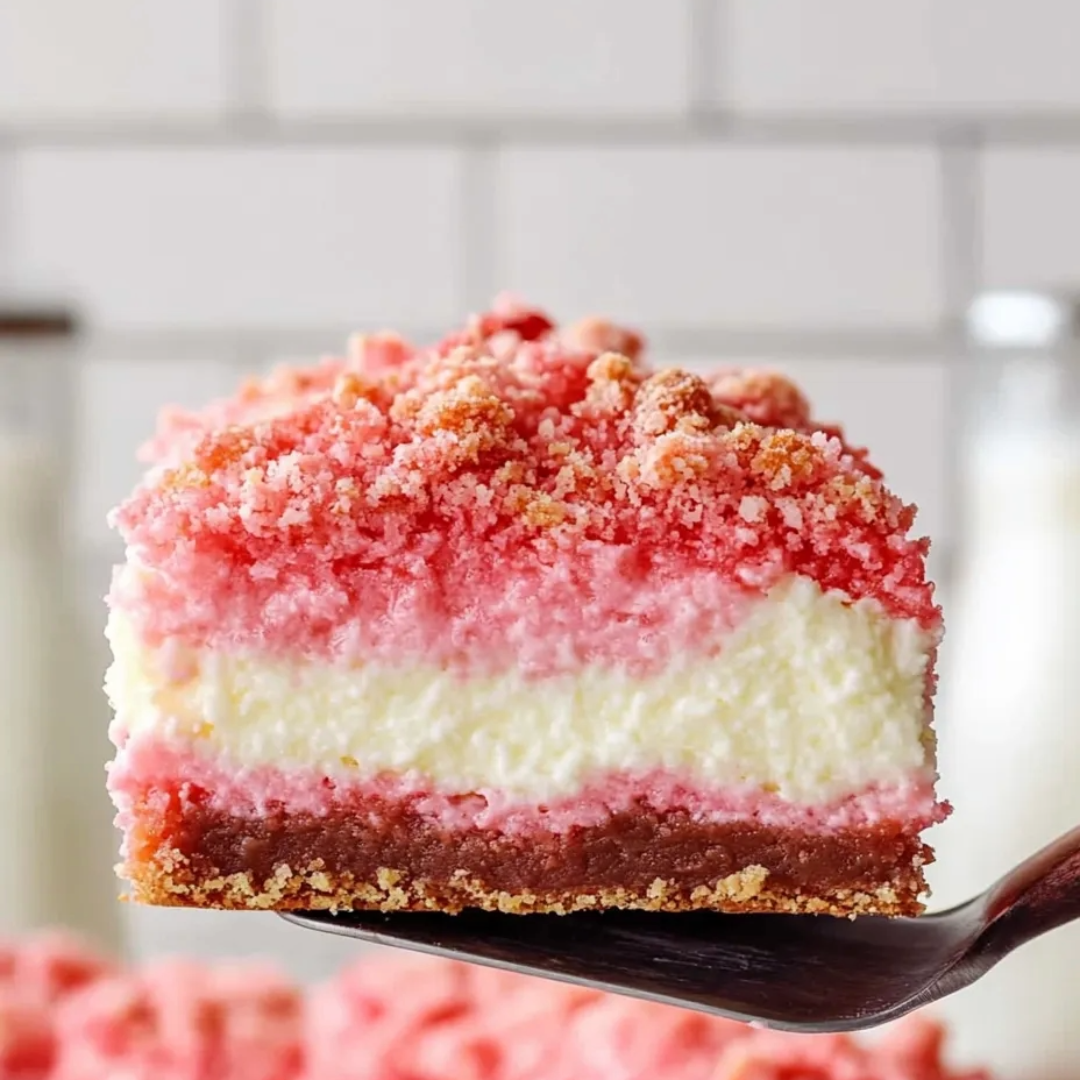
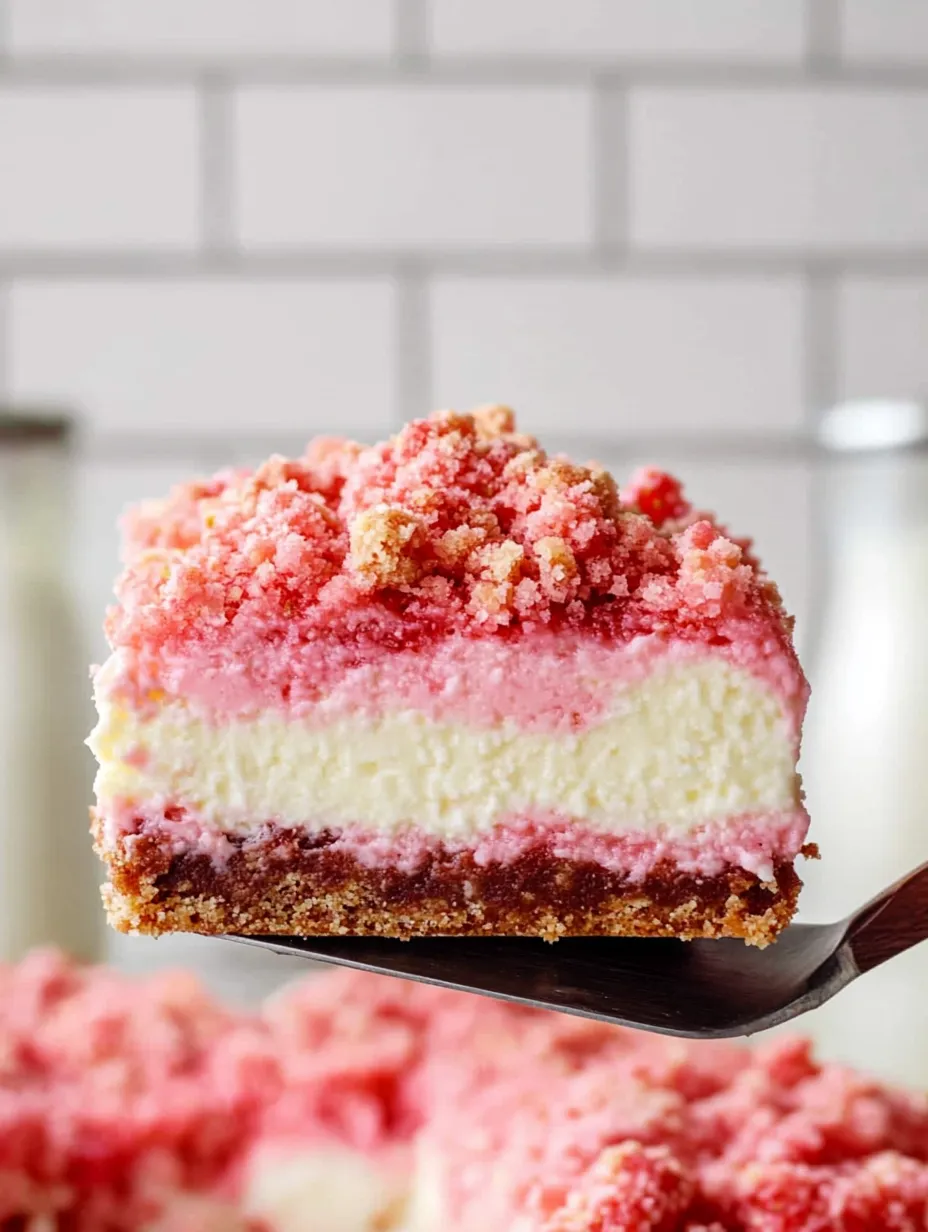
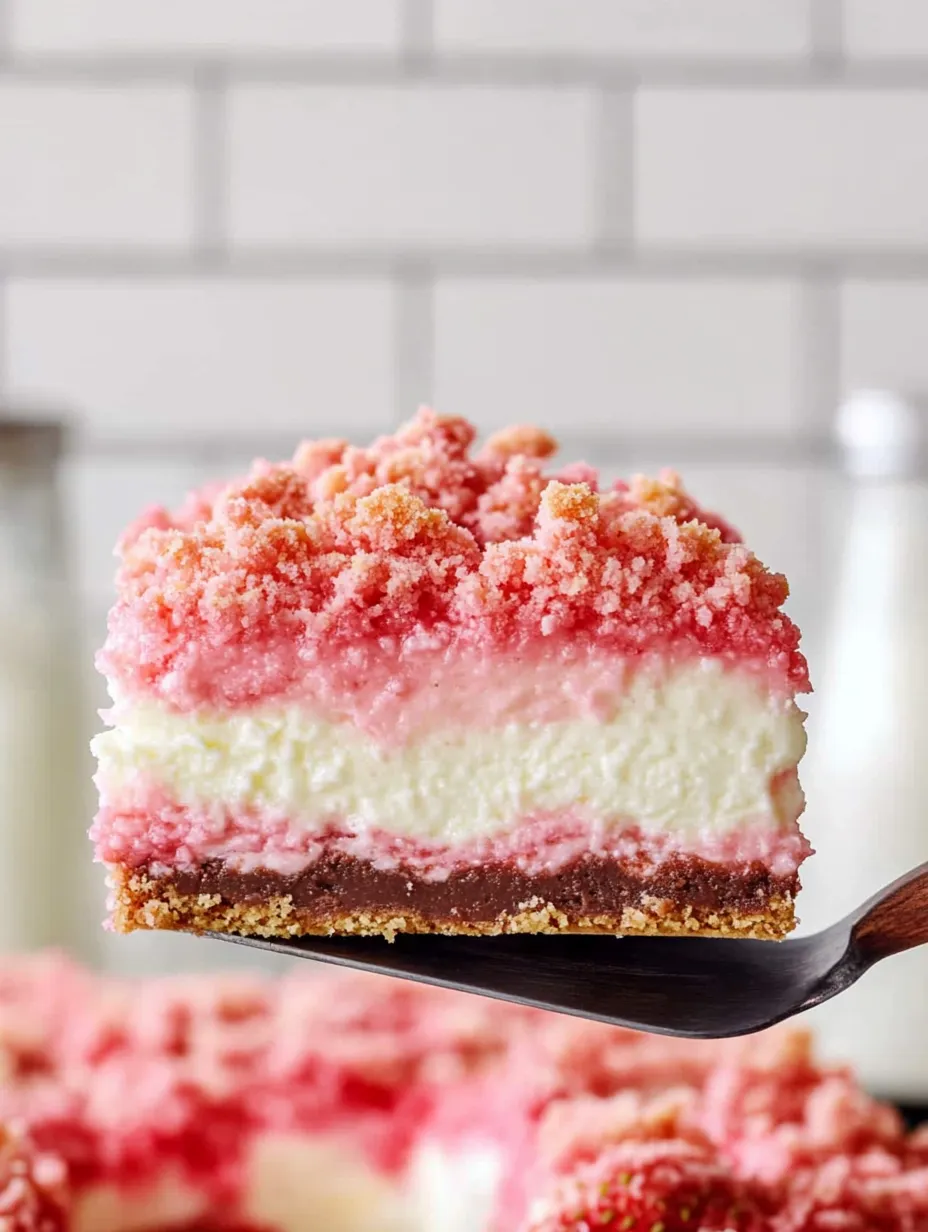
Strawberry cheesecake brownies transform ordinary dessert into an extraordinary experience by combining three irresistible layers into one perfect square. The fudgy strawberry brownie base provides a sturdy foundation, while the creamy cheesecake middle delivers that signature tangy sweetness, and the Golden Oreo crumble topping adds a delightful textural contrast. These gorgeous pink treats are surprisingly easy to make with the help of strawberry cake mix, making them accessible for bakers of all skill levels.
I first made these brownies for my daughter's birthday party last summer when I wanted something special but didn't have time for an elaborate cake. The pink color matched her party theme perfectly, and the guests couldn't stop raving about them. One of the moms even texted me at midnight asking for the recipe because her son insisted they make them the very next day! Now they've become my signature dessert for warm-weather gatherings – pretty enough for special occasions but simple enough for everyday treats.
Ingredients You'll Need
- Strawberry cake mix: The convenient base that gives these brownies their beautiful pink color and berry flavor. Any brand works well.
- Salted butter: Adds richness and helps create that perfect fudgy texture. The salt balances the sweetness.
- Eggs: Provide structure and help bind everything together. Room temperature eggs incorporate better.
- Strawberry gelatin: Intensifies the strawberry flavor and color. Look for the regular (not sugar-free) variety.
- Cream cheese: The star of the middle layer. Full-fat works best for the creamiest result.
- Vanilla extract: Adds depth to the cheesecake layer. Pure vanilla extract provides the best flavor.
- Powdered sugar: Sweetens the cheesecake layer with a smooth texture that blends perfectly.
- Heavy cream: Creates that light, fluffy cheesecake frosting texture we're looking for.
- Golden Oreos: These vanilla sandwich cookies make the perfect crumbly topping. Their subtle flavor doesn't overwhelm the strawberry.
How To Make Strawberry Cheesecake Brownies
- Step 1:
- Begin by preheating your oven to 350°F (175°C) and preparing your baking pan. Line an 8×8-inch square baking dish with parchment paper, leaving some overhang on two sides to create handles for easy removal later. A light coating of nonstick spray helps the parchment stay in place while you work.
- Step 2:
- In a medium mixing bowl, combine the strawberry cake mix, ½ cup melted butter, 2 large eggs, and 2 tablespoons of strawberry gelatin powder. The gelatin isn't just for color – it intensifies the strawberry flavor and helps create that fudgy brownie texture we're looking for. Stir until well combined and no dry spots remain. The batter will be quite thick, but this ensures your brownies will have that perfect dense, fudgy consistency rather than a cakey texture.
- Step 3:
- Spread the brownie batter evenly into your prepared pan, using a spatula to push it into the corners and create a level surface. The thickness of the batter might make this a bit challenging, so dampen your spatula with a little water to prevent sticking. Bake for 25 minutes, or until the center is set and a toothpick inserted comes out with a few moist crumbs (not wet batter).
- Step 4:
- Allow the brownies to cool completely in the pan on a wire rack. This cooling step is crucial – if you try to add the cheesecake layer while the brownies are still warm, the frosting will melt and you'll lose that distinct layered look. Depending on your kitchen temperature, this could take 1-2 hours, but you can speed up the process by placing the pan in the refrigerator after the first 20 minutes of cooling at room temperature.
- Step 5:
- While the brownies cool, prepare your cheesecake layer. In a large mixing bowl, combine 8 ounces of softened cream cheese, 2 tablespoons of room temperature butter, and 1 teaspoon of vanilla extract. Using an electric mixer, beat on medium speed until light and fluffy, about 2-3 minutes. Scrape down the sides of the bowl to ensure everything is evenly incorporated.
- Step 6:
- Gradually add 2 cups of powdered sugar to the cream cheese mixture, beating on low speed initially to avoid a sugar cloud, then increasing to medium speed once incorporated. Pour in 2 tablespoons of heavy cream and continue beating until the frosting is smooth and fluffy, about 2 more minutes. The frosting should hold its shape but still be spreadable.
- Step 7:
- Once the brownies are completely cool, spread the cheesecake frosting evenly over the top. An offset spatula makes this job much easier, allowing you to create a smooth, level surface. If you don't have an offset spatula, the back of a spoon works well too – just warm it under hot water and dry it between strokes for the smoothest result.
- Step 8:
- For the crumble topping, place about 15-20 Golden Oreos in a food processor and pulse a few times until they're broken down but still have some larger chunks for texture. You're looking for a mixture of crumbs and small pieces, not a fine powder. If you don't have a food processor, place the cookies in a zip-top bag and crush them with a rolling pin or the bottom of a heavy glass.
- Step 9:
- Transfer the cookie crumbs to a small bowl and sprinkle with the remaining 1 tablespoon of strawberry gelatin powder. Drizzle with 2 tablespoons of melted butter and toss until the mixture is evenly moistened. The butter helps the crumbs stick together slightly while still maintaining that crumbly texture.
- Step 10:
- Sprinkle the cookie crumble evenly over the cheesecake layer, gently pressing it into the frosting so it adheres but doesn't sink in completely. For the best flavor and texture, refrigerate the brownies for at least 1 hour before cutting into squares and serving.
The magic of these strawberry cheesecake brownies lies in their perfect balance of flavors and textures. The brownie base provides a fudgy foundation, while the cream cheese layer adds tangy sweetness that cuts through the richness. The crumbly cookie topping brings a delightful contrast that makes each bite interesting.
What makes these brownies particularly special is their versatility. They're elegant enough to serve at bridal or baby showers but approachable enough for casual family dessert. The pretty pink color makes them perfect for Valentine's Day, Mother's Day, or any spring or summer gathering.
I love that these brownies use cake mix as a shortcut, but the result tastes completely homemade. The addition of gelatin and butter transforms the cake mix into something entirely different – dense, fudgy brownies that bear little resemblance to their cake origins. This clever hack saves time without sacrificing quality.
I've found that the type of strawberry cake mix you use can slightly affect the final color and flavor. Some brands produce a more vibrant pink, while others yield a more subtle hue. Either way, the strawberry gelatin helps intensify both the color and flavor, so you'll always end up with delicious results regardless of which brand you choose.
For an extra special presentation, I sometimes garnish these brownies with fresh strawberry slices right before serving. The fresh fruit not only adds a beautiful finishing touch but also reinforces the strawberry flavor and adds a juicy freshness that complements the denser layers.
My family loves these year-round, but I find they're especially perfect during strawberry season when we're already enjoying the fresh berries in other dishes. They make a wonderful finale to a backyard barbecue or a refreshing dessert after a warm day spent outdoors.
My final thought on these strawberry cheesecake brownies is that they represent the perfect balance between convenience and indulgence. They take advantage of smart shortcuts while still delivering a dessert that tastes completely homemade and special. The combination of textures and flavors creates something far more interesting than any single-component dessert could be on its own. Whether you're an experienced baker or just starting out, these triple-layer treats are sure to impress while being surprisingly simple to create. They've become my go-to recipe whenever I need a dessert that makes people say 'wow' without keeping me in the kitchen all day!
Frequently Asked Questions
- → Can I use a different flavor of cake mix?
- Yes! While the strawberry flavor creates the signature taste, you could substitute vanilla or white cake mix and add more strawberry gelatin for flavor if preferred.
- → Do these need to be refrigerated?
- Yes, because of the cream cheese frosting layer, these brownies should be stored in the refrigerator. They'll keep well for up to 4 days.
- → Can I make these without a food processor?
- Absolutely! For the crumble topping, place the Golden Oreos in a zip-top bag and crush them with a rolling pin instead. Then mix with the gelatin and melted butter in a bowl.
- → Can I use regular Oreos instead of Golden Oreos?
- Yes, though it will change the appearance and slightly alter the flavor. Golden Oreos provide the classic strawberry shortcake look, but chocolate Oreos would create a chocolate-strawberry combination.
- → How do I get clean cuts when slicing these brownies?
- For the cleanest cuts, refrigerate the brownies for at least an hour before slicing. Wipe your knife clean between cuts and use a gentle sawing motion rather than pressing straight down.